Showing posts with label house. Show all posts
kimmysphere
Artwork hung on a wall can dramatically enhance the feel of any room. The challenge is finding that perfect artwork for that particular room.

As some of you are aware, it was my nephew’s first birthday last Wednesday. The big 1. The day where he finally phases out of infancy and ventures into childhood and single whole digit numbers. On Saturday, Naysta and Vanny threw him an epic birthday party to commemorate this special transition, this turning of the clocks. It was truly a marvelous day full of sumptuous food and delectable sweets. I will post soon about the actual day, it was a fest for the eyes.

The planned party was numerous months in the making. As an aunty, I wanted to buy him a present that was special, but practical, something that was fit for such a momentous occasion. Those who know me, know that I’ve never really been exposed to infants and children. I grew up playing with family friends of a similar age to me, there were rarely really young kids running amuck and if there were, they weren’t of a close acquaint to me. Thus, it was quite special yet daunting to have my nephew be born and enter my life. Many things I’ve done with him have all been firsts for me, babysitting, changing nappies, playing, putting him to sleep etc etc. Therefore I wanted to get him something that was special and sentimental, to thank him for all the lessons he had taught me.

As part of his present, I thought it would be an exquisite idea if I made him something unique and personalized, to memorialize such a special occasion. I had seen one particular canvas artwork from blogs which appeared to be comparatively easy to make, yet looked exceptionally awesome in nurseries and kids room. As Kai’s room has the green safari theme, I wanted to stay with that theme of jungle animals and so decided to incorporated it into the artwork.

Materials you will need:
• A framed canvas
• Decorative paper in different patterns
• Ribbons in different sizes and patterns
• Mini craft pegs
• Card board paper
• Plain white paper
• Spray adhesive
• Sticky tape
• Scissor

Step one: Firstly, you need to draw the animals and letters on plain paper to use as your template. Once you’ve drawn all the silhouettes that you need, take your scissor and cut those shapes out, taking care to accurately cut precisely what you’ve drawn, especially those little detailed sections.

Step two: Using your template, trace the outline onto the back of your decorative paper. You can use different paper for different animals and letters, or use the same paper for all. Once you’re happy, cut them out.


Step three: Take your different ribbons and measure to find out what lengths you need to cut them. Make sure you give enough at the end so that it can wrap around the canvas and be secured to the back. Arrange the ribbons up the top in whatever order you prefer. You can also line the ribbons vertical if you like, I prefer it horizontal. Wrap the ribbon on the front of the canvas, and using your sticky tape, tape the ribbon to the back of the canvas

Step four: You can paint your mini pegs if you desire, I left them in the natural colour because I thought it actually looked better. Randomly scatter the pegs on the various ribbons, giving it the clothes line look.
Step five: Grap your animal cut outs and spray the adhesive to the back of it. Place it on the canvas before it dries.

Step six: Making the individual name/letter plaque. I decided to use cardboard paper as the backing as I felt it gives the plaque more structure, hence less flimsy. Take your cardboard paper and cut out a shape of your choice. I went with squares as it felt more masculine. Using decorative paper, spray the adhesive to the paper and stick it onto the cardboard to make a nice background. Cut out a small size square for the second layer background.

Step seven: Take your letters which you’ve cut out of decorative paper and stick them onto the plaque. I used the pegs to hold up the plaque, rather than sticking it onto the canvas. This gives the artwork more of a 3d effect.

And there you have it, nice and easy! The hardest part was probably trying to cut the pictures as I had to be extra careful and retain as much detail as I could. Give it a go, it’s very satisfying to make your own artwork. Hopefully Kai loves it as its one of a kind, especially made for him with LOVE!

xox
♥ ♥
kimmysphere
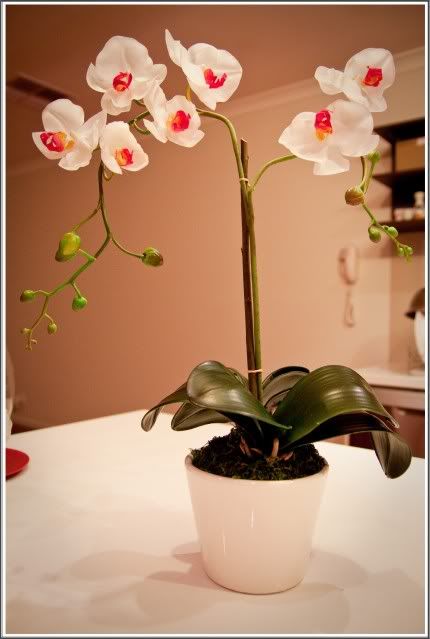
Its been 7 months since I’ve moved into my house, and although the majority of our furnishing has been bought and put in their respective places, I still felt that the house was lacking in something. I’d come to the conclusion that what the house lacks were all the little accents which makes a house a home! The house appears to be too bare and clinical, too minimalistic for my taste. It is in desperate need of slashes of my personality to make it feel more homely. As my finances are currently quite restrictive, I’ve only been able to add small details progressively. I’ve been browsing home decor blogs and have noticed that people constantly have these orchids as ornamental displays in their homes. I love orchids, they are exceptionally pretty yet quite simplistic. I’ve been in the hunt for quite some time now for a nice orchid arrangement that I could use to decorate my house, but they were either too expensive or not quite what I wanted. So I thought I would try my luck at making my own. It was far more easier than I had imagined.

What you'll need:
• Artificial orchid flower $11
• Vase/pot $1.50
• Oasis $1
• Artificial moss $1
• Artificial orchid leaves $8
• Stick (free)
• Superglue (free)
• String (free)


Step One: Cut the oasis to size to fit the pot you’ve bought. I didn’t need to glue the oasis into the pot because I had cut it large enough to just fit the pot. If your oasis is smaller than your pot, feel free to glue it down for extra security

Step Two:  Firstly you want to stick the leaves down. Make sure you angle it towards you so that you get a nice view of the leaves, rather than just its sides.

Step Three: The stick will be used to support the stem of the orchid flower. I managed to find an old stick from outside, and cut it to size. Push the stick into the oasis upright.


Step Four: Put superglue on top of the exposing oasis and stick your artificial moss on. This gives it a more realistic look, as well as covering the unattractive oasis.

Step Five: Stick your orchid flower right next to the stick and bend the flower to shape of your liking


Step Six: Use string to tie the orchid stem to the stick
The whole project cost me $22.50, and its completely unique. One of a kind because I made it myself. Give it a go, it is a very easy and satisfying project. The whole process only took 10 minutes out of my time, very quick and straightforward. I’ve very proud of myself once I’d accomplish that. Now, onto my next project…


xox
♥ ♥
kimmysphere

Early March 2008

As some of you may already know, back in 2008, Nana and I took the plunge and secured ourselves a little patch of Australian dirt! Fast-track to 2010 and we have finally built and moved into our new home. Sounds simple does it not, buy land, build, move in. And hey presto, instant home! Well, let me just dispel this fairytale myth and plant reality firmly back into its rightful place. Back in March 2008, as we were quite young and practically penniless, our budget wasn’t of a standard to be admired. Therefore, when we were both looking at procuring our first house, we mainly looked into old established homes which were located approximately around our current neighbourhood. Nan was adamant that we should buy in our area as he refused to move out any further.

When searching for that elusive house, we were armed with three very distinct criterias: 1. We wanted a nice house 2. Attached to that a cheap price tag 3. Within our current neighbourhood. Not much to ask for right (lol)?! I know, we wanted the whole world, but weren't willing to pay the price! We never even entertained the very idea of building a house, simply because we thought it was completely and quite utterly out of our budget range. However, after scrutinising briefly through the local real estate ads and the internet, we came to the sad conclusion that an old established home just wouldn’t be sufficient, it just wouldn’t fit in our grand master plan of life.

That moment of defeat however gave me the inspiration to sit down one sunny afternoon and methodically crunch some numbers to devise a new plan of action. What is this new plan? Well, for the amount of money which we would need to buy an established home in our neigbourhood, plus stamp duty and all other associated governmental fees, it would cost just as much to go out 15mins drive further from our current neighbourhood, and purchase a block of land in an up-and-coming neighhourhood littered with new estates. The amount of money saved on stamp duty when purchasing land is in excess of $10K! Added to the mix the government’s willingness to give more to those willing to build a house, it wasn’t hard to distinguish which option was best for us. At least this way, two out of our three criterias were met. It’s all about compromising, and taking opportunities by the horn when it presented itself. With this new found epiphany, I presented Nan with my arguments and calculations as to why it would be more economically viable for us to proceed in this direction. It truly wasn’t difficult to persuade Nan to see things my way. All that was required was for me to fill his head up with pictures of nice new things and a beautiful house, it was like dangling a carrot!

And there, my friends, begins our journey of finding our perfect block of pristine Aussie land, building our first home, and chasing that elusive Australia dream…


xox
♥ ♥
Labels: 8 comments | | edit post